
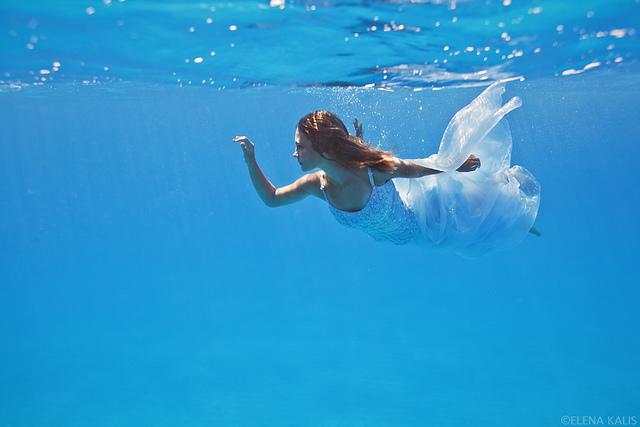
A Quiet Moment Before the Surface Breaks: The first thing you notice underwater isn’t silence, it’s the way sound changes. It softens, stretches, and becomes distant. Light behaves differently, too. It bends and fractures, slipping across skin in slow-moving patterns. Hair lifts as if it has its own intention. Fabric drifts half a second behind every movement.
This is where mermaid photography begins, not with costumes or props, but with a shift in physics. The environment does half the storytelling for you. The rest comes down to how you read it. A good submerged portrait doesn’t try to force fantasy. It lets the water create it.
The Idea Behind a Mermaid Photoshoot
At its core, a mermaid shoot is about transforming a human subject into something that feels at home underwater. That doesn’t happen through styling alone. It comes from how the subject interacts with the space, how they move, how they hold tension, and how they breathe between frames.
Unlike studio work, where you control everything, here you’re constantly negotiating with buoyancy, refraction, and limited time below the surface.
The concept leans heavily on environmental storytelling:
- Is the subject lost or powerful?
- Floating or anchored?
- Calm or resisting the water?
Those decisions influence everything: composition, light direction, and lens choice.
Building the Look: More Than Just a Tail
The obvious starting point is the tail. But in practice, tails are often restrictive. They limit movement and reduce the natural flow that makes underwater images feel believable.
Instead, many shoots rely on:
- Sheer fabrics that react to water currents
- Layered textiles for depth and motion
- Minimal but reflective makeup to catch light
Hair becomes one of the strongest visual elements. Long, loose hair creates lines that extend the composition beyond the subject’s body. It fills negative space naturally.
From a technical standpoint, you’re thinking about:
- How fabric catches light at different exposures
- Whether the highlights clip too quickly on reflective materials
- How color shifts at depth (reds fade fast, blues dominate)
Everything needs to hold up once submerged, not just visually, but physically.
Choosing the Right Environment
Controlled Water (Pools)
- Clean backgrounds
- Predictable light behavior
- Easier for repeated takes
This is where you refine technique, dial in exposure settings, test compositions, and work closely with the subject.
Open Water (Ocean, Lakes, Cenotes)
- Unpredictable visibility
- Natural textures like rock, reef, or sand
- Light rays that shift constantly
Here, you’re reacting instead of controlling. You wait for moments when light direction aligns with subject placement, when particles in the water catch the sun just enough to add depth without overwhelming the frame. Each setting demands a different mindset. Pools are about precision. Open water is about timing.
Movement, Not Posing
Traditional posing breaks down underwater. The moment a subject tries to hold a position, it immediately feels unnatural and stiff. Instead, the focus shifts to guiding movement. The subject gently pushes off the pool floor, exhales slowly to release a trail of bubbles, and allows their limbs to drift before making subtle corrections. Rather than chasing a single perfect frame, you shoot in short bursts, watching closely for the moment when everything aligns—hair suspended naturally, fabric settling into shape, and the body finding balance within the water.
From a composition standpoint, diagonal lines tend to feel more fluid than vertical ones, echoing the natural movement of the environment. Negative space becomes more significant as floating elements expand beyond the subject, and framing has to account for the slight distortion caused by the water’s surface. In the end, it becomes less about directing a fixed pose and more about observing a sequence as it unfolds.
Light: The Real Subject
Light underwater behaves differently enough that it becomes the main subject, whether you intend it or not.
Key considerations: Dynamic range is limited underwater, so highlights tend to blow out quickly near the surface, while light falloff happens faster than expected as you go deeper. At the same time, color temperature gradually shifts toward blue and green, altering how tones appear in the frame.
You’re constantly adjusting: You adjust shutter speed to freeze motion without losing the softness of ambient light, balance aperture to maintain enough depth while still separating the subject, and shift ISO depending on how deep or dark the water becomes.
Natural light often works best when:
- The sun is high
- The water is clear
- The subject stays within a manageable depth
Artificial lighting can add control, but it also introduces complexity, backscatter, harsh shadows, and setup time.
Gear That Holds Up Underwater
The gear setup needs to be simple, reliable, and fast to operate.
Typical approach: Wide-angle lenses help you stay close to the subject while minimizing water distortion, dome ports preserve the natural field of view, and an underwater housing keeps all controls easily accessible and adjustable while submerged.
Why wide lenses matter: Wide lenses let you get physically closer to the subject, reducing the amount of water between the lens and the frame, which improves clarity, while also enhancing the surrounding environment in the composition.
You’re also thinking about:
- Focus speed in low-contrast environments
- Button accessibility while submerged
- Battery life, because you don’t want to open the housing mid-shoot
Workflow Beneath the Surface
Shooting underwater is physically demanding for both photographer and subject. A typical rhythm looks like this:
- Brief the subject above water
- Submerge together
- Capture a short burst
- Surface, review quickly, adjust
Communication is minimal once submerged, so clarity beforehand matters. Hand signals help, but most of the direction comes from repetition and trust.
You also need to watch for: Fatigue, Breath timing, Water temperature
The technical side is only half the job. The rest is managing energy and safety.
Where the Magic Actually Happens
What separates a good mermaid shoot from a forgettable one isn’t the costume or location. It’s the moment when everything stops looking staged.
It might be:
- A strand of hair crossing the face at the right time
- A natural exhale creates a trail of bubbles
- Fabric catching light just before it sinks
Those moments can’t be forced. You create the conditions, then wait. That’s the rhythm of this kind of work: control what you can, then let the water take over.
Closing the Loop
A mermaid photoshoot isn’t really about fantasy. It’s about adapting to an environment where your usual instincts don’t apply.
You learn to:
- Let go of rigid posing
- Trust movement over control
- Work with light instead of chasing it
And somewhere in that process, the images stop feeling constructed. They start to feel discovered. That’s when the illusion works, not because it looks magical, but because it feels natural.
If you’re ready to explore this world firsthand, a session with Max Blakesberg Studios is where that experience begins.